I recently purchased a double pack of wireless microphones (specifically, these ones) to replace my ageing and faltering wired one. I am very happy with the audio quality, their ease of use and their range, but for my specific use case, the battery life (around 3 hours) leaves a little to be desired. I mainly use these while hanging out with a friend over the internet while sharing my screen, and we'll watch movies and TV shows together. That can last a couple of hours or even most of the day, and at some point the battery for the microphone will run out.
The first time this happened, it took me a little while to understand what was going on, as there was no beep or any indication from the microphone to signal its demise. Apparently the LED on the device will blink when it's low on battery, but that's impossible to see when it's clipped to my shirt right underneath my chin.
But, through the magic of buying two of them, the solution is easy — swap the depleted mic with a freshly charged one, then recharge the depleted mic while you discharge the fresh one. Still, the problem of not knowing when to do that persists.
The code
That's right, we're writing more Bash. Normally, you could just set a timer for your phone or your computer, but we're watching content that has sound whilst wearing headphones. What I wanted was a solution that could pause all playing media and tell me to swap my mic out, so that's exactly what I wrote:
mic-change.sh:
#!/usr/bin/env bash
matches=$(playerctl -l)
IFS=$'\n'
read -r -d '' -a matchedPlayers <<< "$matches"
numPlayers=${#matchedPlayers[@]}
((numPlayers--)) # To use zero based indexing

for i in $(seq 0 "$numPlayers"); do
    currentPlayer=${matchedPlayers["$i"]}
    status=$(playerctl -p "$currentPlayer" status)

    if [[ "$status" == "Playing" ]]; then
        playerctl -p "$currentPlayer" play-pause

        if [[ "$currentPlayer" == "kodi" ]]; then
            sleep 1
        fi
    fi
done

mplayer "/opt/sfx/mic-change.mp3"
How to use
Run the script when you turn on your microphone, and re-run it whenever you swap your mic. Examples:
Run a sleep then the script from the terminal: sleep 9000; /opt/scripts/mic-change.sh
Put the sleep at the start of the script (after the shebang) and run it
Use a timer app that can launch scripts when the timer finishes, like KClock
(9000 seconds is 2h 30m)
Script explanation
This script uses playerctl to pause all currently playing media players via the MPRIS D-Bus specification. Most players for Linux support this natively. Kodi, my media player of choice, does not, but support can easily be added through an addon. The script goes through every currently registered media player, and checks if it is currently playing. If it is, it pauses it. If it is Kodi, it waits a second before doing anything else, since Kodi has a ~1 sec delay when pausing before audio stops playing (and also an annoying corresponding ~1 sec delay before audio starts playing again once you unpause). Finally, it plays the sound defined in the last line of the script using mplayer, which in my case is a TTS voice named Onyx telling me to "Change your mic, motherfucker."
If you'd like to get the same microphones, which are very good despite the relatively short battery life, you can get them on AliExpress here.
The product links in this article are affiliate links. If you buy something using them, I may earn a small commission at no extra cost to you.
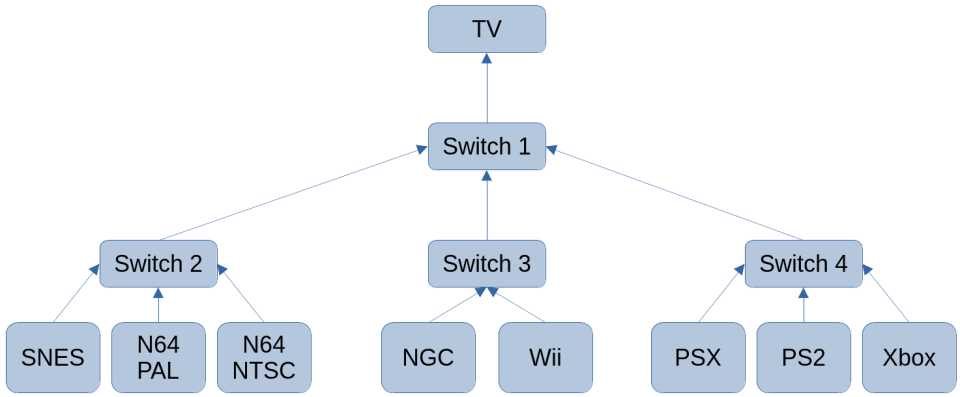
The past few months, I've spent some time to set up a room in my house to be a pretty sweet space dedicated to retro-gaming. This includes a vintage PC, a CRT TV, and a multitude of classic games consoles hooked up to four RCA/AV switches. This works well, and to play the console we want, one can just flip a couple of switches instead of having to unplug and shuffle around literally 8 different sets of RCA cables.
Thing is, when you're playing games, especially during couch coop, things tend to happen. Some of these things, depending on the types of games you play, can be utterly hilarious, and worth saving for posterity. With the two last generations of consoles I own, PS5, PS4 and the Nintendo Switch, you can just press a single button on the controller to save recent gameplay as a file to the system storage, which is awesome. When you also enjoy playing on 20-30 year old game consoles as well, this part becomes a bit trickier.
Emergent technologies
Enter: The "Retrocorder" - the dedicated computer I've set up to continuously record all retro gaming gameplay as it happens.
For reference, this is what my setup looked like before Retrocorder:
(If I stick with 3-port switches, I can only get one more console before I have to add another level to the hierarchy 😳)
Since all the signals involved here are analog, you'd think there would be some degradation at each step. That might be true, but none are perceptible to me in regards to image or sound quality, and the cables between the switches are short, minimizing signal loss.
Hardware
If you want to follow along at home, here's a parts list:
Spare PC with a processor powerful enough to record and encode 480p/576p video in real time (using h264 this roughly means any CPU from the last 10 or so years)
The above links are affiliate links. If you buy something using them, I may earn a small commission at no extra cost to you.
Using these parts, we can split the RCA cables right before the TV, and lead one end to the TV, and the other into our capture card, like so:
As you can see from the chart, the splitters are inserted between the first switch and the TV. This way, no latency is introduced to the TV, so we can play our games normally without any changes to our gameplay. We can also swap game consoles mid-session and have no interruptions to the video recording, since the video is captured from the first switch.
Regarding the 3-6x RCA cables listed: 3 of them go from the first split of the RCA Y splitter to the TV. As for the other 3 - depending on how your splitters and AV2HDMI box look, you may or may not need them. I was able to plug the second split of the RCA Y splitter directly into the AV2HDMI box without using the extra 3 cables - your mileage may vary.
The reason I recommend the HDMI capture card over the RCA/AV capture card, is because AV capture cards tend to have issues switching between NTSC and PAL video signals. I mix NTSC and PAL video signals all the time, as I own consoles and games of both regions. My CRT TV supports both signals, which isn't a given for any CRT TV either, so make sure yours does before you mix signals and end up with unusable video files. The HDMI route isn't immune to this issue either, but the AV2HDMI converter box seems to handle this a lot better, and seems to send the same signal to the capture card regardless of input. I also experienced horrible buzzing noises during recording when using my AV capture card, presumably due to interference, but that might be down to a faulty card that's been stored in a box for 10 years or more.
The AV2HDMI converter box works great, and will detect a change in signal automatically. In my testing and usage, I have found only one combination of consoles/game regions that will throw it for a loop - playing NTSC games on a PAL GameCube (via Swiss). This outputs a black and white, wavy signal from the AV2HDMI box, presumably because the GameCube is outputting an esoteric (or out-of-sync) signal that it doesn't quite understand. The TV shows the signal just fine, however. Playing PAL games on the same console works fine, so I've solved this issue by just using PAL games instead. The PS2, where I also mix NTSC and PAL games on a PAL console, does not exhibit this problem, and both regions display fine when captured.
Software
Now that all the hardware is plugged together, it's time to make this as seamless as possible using software.
For the operating system, I use my default go-to for projects such as these: The latest Kubuntu LTS. KDE is my favourite desktop environment, I'm very familiar with it at this point, and the Ubuntu LTS base provides a solid foundation.
The hardware of the PC is modest, as this is an ancient PC that I used as a daily driver 10 or so years ago, only upgraded with an SSD:
CPU: AMD FX-6100 Six-core @ 3.300GHz
GPU: AMD ATI Radeon HD 7870 GHz Edition
RAM: 8 GB
SSD: 128 GB
After installation, we can start installing some software, and setting some desired options.
obs-cli - Make sure you get you get the one from pschmitt - the other ones I've found are all defective or outdated
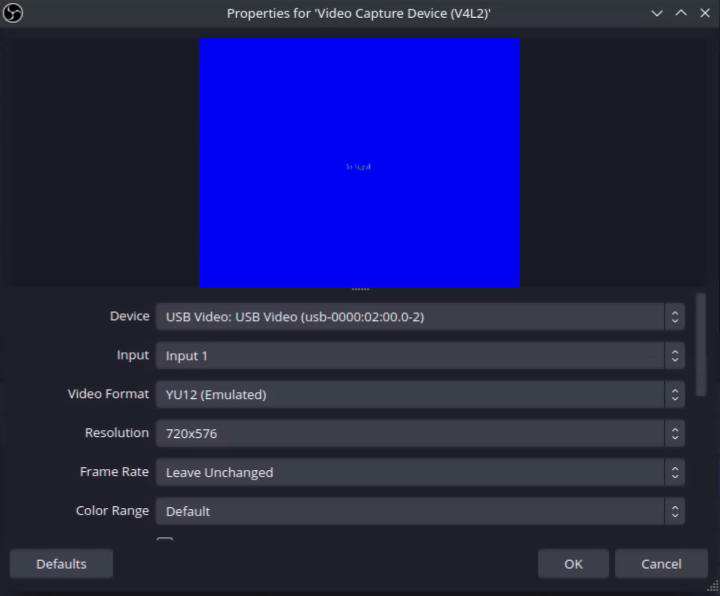
Now, set up your scene in OBS. At the bottom, add a new video source.
I had to pick YU12 to get the correct image for my setup, but yours may be different. The AV2HDMI converter box outputs a 720p or 1080p signal, configurable by a physical switch on the unit itself. I set mine to 720p, and the recording resolution to 576p, as no console in my setup outputs anything higher than that over AV anyway.
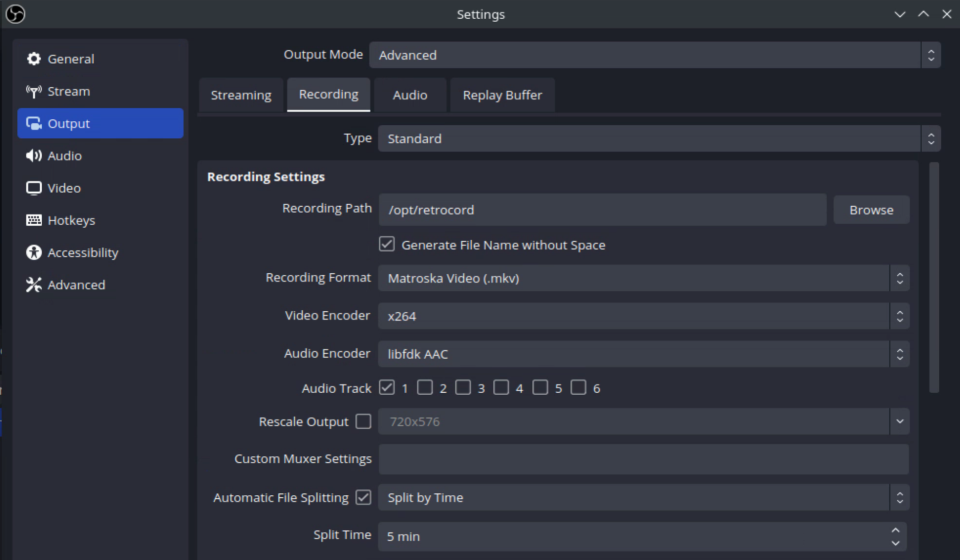
Now that that's out of the way, we just need to configure a few things about the recording environment. In OBS, go to File > Settings, then Output, and set Output Mode to Advanced. Click the Recording tab, then set your desired settings:
My changes from the default:
I've used /opt/retrocord as the folder to store all my recordings.
I've checked "Generate File Name without Space"
I've set the video encoder to x264 as it is light on CPU and produces files of a manageable size
I've enabled "Automatic File Splitting"
I've set "Split Time" to 5 min
The reason I've enabled automatic file splitting is twofold: To not end up with files of gargantuan sizes, and to let me delete older files in the directory when it becomes too large, without having to split file and review what I want to save.
Click OK. Next, choose Tools in the menu bar, then click WebSocket Server Settings. Check Enable WebSocket server, then click Show Connect Info. Note down the Server Port and the Server Password, as you'll be needing it soon. Close the connection info window and click OK in the WebSocket Server window.
Scripting scripts
Your recording environment should now be ready to use. The next step is to automate this, so you don't need to manually interact with OBS to make it do its thing. I accomplish this using two scripts; a login script and a logout script.
/opt/scripts/retrocorder-start.sh:
#!/usr/bin/env bash
obs --startrecording &
/opt/scripts/retrocorder-stop.sh:
#!/usr/bin/env bash
obs-cli --host localhost --port 4455 --password abcde12345 record stop
sleep 1
kill -s TERM "$(pidof obs)"
sync
In retrocorder-stop.sh, you need to change two values in the second line: the port and the password that you noted down earlier (4455 and abcde12345 in the example above). The reason we need obs-cli in the first place and the OBS WebSocket Server to be running, is that while OBS can let you send it an argument to start recording, it has no such argument to stop the recording in progress (for some god-awful reason).
As you might have noticed, this setup might end up with a full disk after enough usage, so we're gonna have to deal with that with another script. This time, we're gonna set up a cron job to be run once an hour, to prune the oldest videos in the recording directory, once a size threshold has been exceeded:
/opt/scripts/retrocorder-prune.sh:
#!/usr/bin/env bash
cd /opt/retrocord || exit
limitBytes=$((50*1024*1024*1024)) # 50 GiB

currentDirSize="$(du -bs | awk '{print $1}')"
if [[ "$currentDirSize" -gt "$limitBytes" ]]; then
    while [[ "$currentDirSize" -gt "$limitBytes" ]]; do
    purgeFile=$(ls -rt *.mkv | head -n 1)
    rm "$purgeFile"
    currentDirSize="$(du -bs | awk '{print $1}')"
    done
fi
This script deletes the oldest files in a directory until the total directory size is less than 50 GiB. Change the second line of the script to point to your recording directory, and the third line to reflect how much disk space you'd like to allocate to recordings. I've set mine to 50 GiB, as that is plenty, and leaves lots of headroom on the 128 GB SSD.
On my setup, 5 mins of recording equals around 100 MiB. This means that I can record > 42 hours of gameplay before the script starts purging - more than enough time to save any clips I want to keep!
512,000 MiB / 100 MiB per 5 mins = 512 files á 100 MiB
512 files * 5 minutes per file = 2560 minutes
2560 minutes ≈ 42.66 hours ≈ 1.77 days
Finally, put the script in your crontab. First, edit your crontab:
$ crontab -e
Then append a new line at the end of the file:
0 * * * * /opt/scripts/retrocorder-prune.sh
Save and close the file (if the editor is nano, press, Ctrl+X, then Y, then Enter).
This will make the script run once an hour.
Setting settings
Note: These settings are for KDE Plasma. There are most likely equivalents for these settings in all other major DEs.
Once the above scripts are created, in Plasma, go to System Settings > Startup and Shutdown > Autostart. Click Add at the bottom of the window, then pick Add Login Script. Navigate to and pick /opt/script/retrocorder-start.sh. Now do the same for the logout script: Click Add > Add Logout Script, then navigate to and pick /opt/scripts/retrocorder-stop.sh. This will automatically start and stop recording when you log in and out of the computer.
To make this completely automatic, you'll also need to make sure you're automatically logged in to the computer. Also in Startup and Shutdown, pick Login Screen (SDDM), then click the button labeled Behaviour on the bottom left. Next, check the box next to Automatic log in, then choose your user and session on the same line. Click Apply.
Also in Startup and Shutdown, pick Desktop Session, then uncheck the box next to Logout Screen - Show. This makes sure when you request a shutdown, it is done immediately.
The next destination is still in System Settings, under Power Management this time (called Energy Saving in earlier versions of Plasma). Uncheck all checkboxes, then check Button events handling. In the drop-down box When power button pressed, pick Shut down.
Lastly, if you wish access this computer over SSH, install and enable openssh-server:
This allows you to log in remotely via SSH. Additionally, it lets you use FISH to easily copy files from the Retrocorder to your main machine; SSH-enabled servers can be accessed in Dolphin by using the fish: URI scheme in the address bar:
fish://192.168.0.123/
You could also set up an NFS or SMB share, but that's out of scope for this post.
Headless chicken
Note: This section mostly applies to desktop PCs. If you're using a laptop, you're more or less done.
At this point you should be in a state where everything is automatic. Starting with the PC off, when you press the power button, the computer will boot, log you in, start OBS and start recording. Once an hour, your recording directory will be checked, and if it's too big, the oldest files will be deleted. OBS will keep recording until you hit the power button. Once you hit the power button, OBS will stop recording, close, the disks will sync, and the computer will turn off.
Wouldn't it be cool if you didn't need that pesky monitor, keyboard and mouse?
In most cases, if you don't have a display attached, the computer will not boot to a graphical environment. There's two ways to fix this, either by creating a dummy display (Xorg only), or by getting a physical dummy connector which will fool your computer into thinking a display is attached. There are dummy connectors available for all sorts of display connectors, but this post will focus on the software solution, as it works great for me.
This following solution only works on Xorg. I don't know if Wayland has an equivalent method of making a dummy display, but I'm sure you could find something by searching the web.
If you're not on *ubuntu, xorg.conf might live somewhere else, such as /etx/X11/xorg.conf. In many cases, it doesn't exist and must be created - searching the web is your friend again here.
Save this file, which configures a dummy 1280x720 display. In my experience, increasing the resolution doesn't do anything, the dummy display seems to max out at that resolution.
Restart your computer, and recording should now start, even without a display attached! It will also enable you to remote control the desktop using NoMachine or equivalent remote control software.
You should now have a fully automated recording solution for your retro gaming setup! :) The only thing you need to do now is press the power button to turn the computer on and start recording, and press it again to shut down when you're done.
Here's a sample of gameplay recorded from my Retrocorder. It's by no means perfect, but it's more than good enough for my purposes - saving fun or memorable bits of gameplay. This clip is me playing the 2006 PS2 game Black:
YouTube truncates this to 480p, so if you want the source file, you can get it here!
Closing thoughts
The first time I tried booting my PC after setting up the dummy display, it would not start up, much to my annoyance. Turns out this motherboard is one of those who will halt the boot process if a keyboard isn't connected - easily fixed by changing the BIOS settings not to halt on keyboard errors.
I bought a new TV a year and a half ago. Much to my dismay, I discovered that while the picture quality is great, the audio quality is not, unlike my previous TV. My daily driver Linux PC is connected to my TV, and is my main entertainment hub for TV shows, movies and video games, and also general PC usage, so I figured I had to get an external speaker or sound bar. My dad had a spare speaker which he had replaced with a newer unit, so I inherited the spare - a "Geneva Sound System Model S DAB".
It came with a small caveat: the speaker will not turn on using the remote control. Mind you, it will turn off just fine with the same exact button, and every other button on the remote works as advertised - it just will not turn on using the remote. I figured that this was no big deal, and accepted the speaker with thanks. I get the speaker situated and hooked up, and the audio quality is great - a big upgrade from the built-in TV audio. Great for music, great for movies, great for games, just all-round great...
Perturbation
...until I read some news, or do anything that doesn't produce any sound for a while. This is when the European Commission decides to take a retroactive shit in my cereal. Since 2009, audiovisual equipment such as speakers are required to switch to a low-power mode after a reasonable amount of time. In and of itself, that is a good requirement, and will save power when such devices are not in use. Sometimes it's a bad requirement, and that is when:
a) the automatic standby feature can't be disabled, and
b) the unit can't be powered on with the remote control
Bargaining
This particular set of circumstances means that whenever I'm using the computer, and switch between tasks that produce sound, and those that don't, I risk the speaker powering down, and having to get up, walk over to the speaker underneath the TV, and power it back up manually. That wouldn't be so bad if it was a once-a-day thing, but the auto-standby timeout for the speaker is fixed at 30 minutes, so you might see how this gets real old, real fast. The speaker itself works fine, and it's a shame to generate e-waste from something that's only partially defective, so I decide to stick with it. I wouldn't blame someone for chucking it and replacing it with a new unit though, but I am particularly stubborn.
Upon discovering this, the first thing I do is start searching the web for the manual for the device, to see if I can address point a) above: turning off the auto-standby function, but I come up short. There doesn't seem to be a way to disable this functionality at all. Since I wouldn't know the first thing about fixing the hardware side of this (fixing the remote not being able to turn the unit on any more), I default to trying to work around it through software.
My first attempt to trick the speaker into staying awake is playing a sound on an interval. A sound which is in frequency range of the speaker, but out of range of my ears. According to specs found online, the frequency range for the unit is 75 Hz to 20 kHz, so I try both ends of the spectrum. Using Audacity, I generate 5 second tones ranging from 76 Hz to 19 kHz, and make a script that plays the tone every 10 minutes, and slowly over the course of a few days, work my way through all the generated tones to see if any will keep the speaker awake.
It doesn't work. None of the tones do. They all play (confirmed by dropping in an audible .wav in place of the generated tones), but it seems as though the speaker is ignoring them. The 17 kHz tone had the added bonus of viscerally startling my friend who could hear the sound (I couldn't), asking what the hell that was.
Most likely the internal logic that checks for sound, checks for loudness/dB values, or some other obscure black magic fuckery I don't understand (spoilers: I am not an audio technician, and possess only cursory knowledge of audio specifics).
My second attempt is a much less sophisticated one: play a short, normal, audible sound every 20 minutes or so. I picked out a ~1 second audio file from my OS, and made it play every 20 minutes. This also didn't work. My conclusion is now that the aforementioned internal logic not only checks for loudness/amplitude, but also has a polling rate greater than a second (or at least, greater than the length of the audio file in question). I don't want to play a longer file either since it's on a fixed interval, it will play over any other media I am consuming, and become another point of annoyance.
Acceptance
At this point, I more or less resign to my fate, and continue using the speaker without any software magic to try to keep it alive. I do the whole song and dance of getting up and turning the speaker back on when I need it, several times a day. My record is 7 times in one long day of intensive programming interspersed by YouTube video breaks.
Redemption
A year and a half passes, to the present day. I am working on some other project, when I notice the speaker turning off again, and spontaneously get an idea. What if I continuously monitor my audio output, and only play an audible sound when it's been quiet for a while? I haven't done anything like that in the past, but after a ton of web searching, and trial and error, I come up with a solution. This relies on using PulseAudio (or PipeWire with its backward compatibility with PA).
That's right, there's finally going to be some code in this article!
anti-energy-saving.sh:
#!/usr/bin/env bash
sinkToMonitor="alsa_output.pci-0000_06_00.1.hdmi-stereo" # find with `pactl list short sinks`
soundToPlay="/usr/share/sounds/freedesktop/stereo/message-new-instant.oga"
tmpOutputSample="/tmp/output-sample.flac" # saves the sample in ram and overwrites it every loop
timeoutSecs=1500 # timeout in seconds - 1500s = 25m

trap quit SIGINT
quit() {
    printf "\nSIGINT received, cleaning up and exiting\n"
    rm "$tmpOutputSample"
    exit
}

secsSinceLastSound=0
while true; do
    currDefaultSink=$(pacmd list-sinks | grep "\* index" -A1 | awk '/name:/ {print $2}')

    if [[ "$currDefaultSink" = "<$sinkToMonitor>" ]]; then
        timeout 5 parecord --channels=1 --file-format=flac --device "$sinkToMonitor.monitor" "$tmpOutputSample"
        meanNorm=$(sox "$tmpOutputSample" -n stat 2>&1 | awk '/Mean +norm:/ {print $3}')
        if (( $(echo "$meanNorm > 0.000700" | bc -l) )); then
            secsSinceLastSound=0
            echo "Sound threshold reached, timer reset..."
        else
            secsSinceLastSound=$((secsSinceLastSound+5))
            echo "Sound threshold not reached, timer is at $secsSinceLastSound/$timeoutSecs seconds..."
        fi

        if [[ "$secsSinceLastSound" -ge $timeoutSecs ]]; then
            echo "Timeout reached, playing sound and resetting timer..."
            paplay "$soundToPlay"
            paplay "$soundToPlay"
            secsSinceLastSound=0
        fi
    else
        echo "Active sink changed, sleeping..."
        secsSinceLastSound=0
        sleep 10
    fi
done
To use this on your system, you'll need to change the values of the variables sinkToMonitor, soundToPlay and timeoutSecs to fit your configuration.
sinkToMonitor needs to hold the name of your default audio sink, which you can find with pactl list short sinks
soundToPlay is a path to the sound you wish to play when the inactivity timer has been reached
timeoutSecs is the number of seconds of inactivity to wait before playing the keep-alive-sound
Make the script executable with chmod +x anti-energy-saving.sh.
You'll also notice that I call paplay twice to play the same sound twice. If you use a longer audio file, you won't have to do this, I just preferred this short and inoffensive sound to play whenever the speaker is nearing its auto-standby timeout.
If you don't speak Bash, this is a quick run-down of how the script functions:
Checks whether you're currently using your default audio sink, if not, sleeps for 10 seconds. I added this because I sometimes use a Bluetooth headset, and don't want the script running on that - only the HDMI output.
If you're using your default audio sink, the script will record 5 seconds' worth of audio that comes out of your speaker to RAM (/tmp)
The audio file is run through sox -n stat to get the average volume of the samples in the clip - if it exceeds a set threshold, the script will reset the inactivity timer. The reason this comparison is > 0.0007 instead of just any value > 0 is because of the aforementioned speaker polling rate; we need to make sure enough sound has been played lately that the speaker won't ignore it.
If the audio clip didn't exceed the threshold, 5 seconds is added to the inactivity timer.
If the inactivity timer is greater than or equal to the timeout value, a sound is played twice to keep the speaker alive, and the inactivity timer is reset
Repeats ad infinitum
You can remove all echoes if you'd like, they are just a remnant of me debugging this in an interactive terminal. The script is designed to run non-interactively in the background without any user input.
Conclusion
The script works great for me and my situation, and I haven't had a single incident of speaker snooze since implementation. I've set it to run on start-up, and it uses very little CPU and RAM. It also won't interrupt any other audio I am playing, since there's a little more thought to it beyond a simple sleep 900.
The PS2 homebrew scene is an absolute mess, and whenever I try to find any information on any operation about it online, I find the following:
A truckload of conflicting information
A myriad of different guides spanning back 20 years
A bushel of different software tools, none of which are usually available on Linux
And a partridge in a pear tree
This time, all I needed to do was to figure out how to get my ISO and BIN/CUE PS2 backups onto an internal HDD for playing through Open PS2 Loader (OPL). All of the above points of note came into play, but after digging and sorting through it all for a bit, I found a reasonable way to do this without having to involve a Windows computer:
Extract the rar, move hdld_2_3/files/hdl_dump_090 to /usr/bin/hdldump
chmod +x /usr/bin/hdldump
You now have hdldump for Linux CLI, hooray!
Every guide I looked at said that one of the downsides of hdldump is that it doesn't do batch operations. Who needs built-in batch operations when you have Bash?
/opt/scripts/batch_hdl.sh:
#!/bin/bash
shopt -s nullglob nocasematch

for i in *.iso
do
    gameName="${i%.*}"
    echo "Injecting ${gameName}..."
    hdldump inject_dvd "$1" "${gameName}" "${i}"
    echo "Finished injecting ${gameName}."
done

for i in *.cue
do
    gameName="${i%.*}"
    echo "Injecting ${gameName}..."
    hdldump inject_cd "$1" "${gameName}" "${i}"
    echo "Finished injecting ${gameName}."
done
Presto. Make the script executable (chmod +x batch_hdl.sh), cd to the directory with your games, then run the script with your PS2 HDD as the only argument.
For added pizzazz, put alias hdlbatch="/opt/scripts/batch_hdl.sh" in your ~/.bashrc or ~/.bash_aliases, then source ~/.bashrc/source ~/.bash_aliases. Now you can run the script from any directory using hdlbatch /dev/sdg to pump that HDD chock full of more games you'll never play.
I have a wall-mounted TV in my bedroom. This TV has a PS4 and a PC hooked up to it. I use the PS4 to remote play my PS5 (which is situated in the living room), and in the past, have used the PC for Kodi/Jellyfin and YouTube in bed, using a USB remote control with support for moving the mouse cursor. Unfortunately, it doesn't do that very well, as the Wi-Fi adapter I have for it keeps presenting issues under Linux. No matter how much I re-compile and reenable the drivers, it just won't work properly, and will randomly cut out after a while. This also happens with several different adapters, so I've kinda just left it there, and used the PS4 to access the web UI of Jellyfin. This is not ideal, and I don't want to spend any more hours fighting with it.
Free fruit
I don't usually use Apple products, but I had a Mac Mini lying around as surplus after having replaced all Macs at my place of work with Windows computers. It's a shame to let it just lie around, collecting dust, so why not use it for something useful, and also solve my bedroom problems (heh) in one fell swoop?
My criteria were as follows:
Absolutely crucial
Support for my USB remote (it identifies itself as a keyboard and mouse so almost anything would fill this criteria)
Support for a wireless game controller (DS4)
Be able to run Kodi and Jellyfin for Kodi
Be able to run Moonlight, for remote playing PC games
Be able to watch YouTube with uBlock Origin and SponsorBlock
Be able to control the whole machine using just my remote and my gamepad
Nice to have
Be able to emulate some games natively, and use the gamepad to do so
Collection and assimilation
After stumbling upon Retro Game Corps' video on Retro Gaming on a Mac Mini, I figured that the Mac Mini I had lying around would be perfect for this, as long as the usual "Whoops! Can't do that on a Mac!" problems didn't stand in the way. I would use EmulationStation Desktop Edition (ES-DE) as the shell to launch Kodi, Moonlight and YouTube from.
I already had the Mac and the USB remote, but not an extra controller. As luck would have it, my step-brother's girlfriend had one she didn't need, so I inherited her bright blue DualShock 4, which is perfect. The other DS4 in the bedroom is black, and will continue to be hooked up to the PS4, while the blue one will be used with the Mac. Unlike in my experience on Windows, pairing and using the DS4 Just Werks™, and was ready to use right away after pairing.
Software setup
After installing the apps I wanted (Dolphin, RPCS3, RetroArch, Kodi, Moonlight), and ES-DE, I was ready to get going. I also installed NoMachine for remote access, in case I want to do maintenance on this machine without having to lie in bed to do so. It took a bit of web searching to find documentation for how to launch arbitrary apps from EmulationStation, but it wasn't really difficult.
By default, when you start ES-DE for the first time, it will ask you to create game folders for different systems, then exit so you can populate those folders with actual games. Do this, then additionally, create a folder called "Apps" in the folder you chose (typically ~/ROMs).
You can now make a custom system in ES-DE, by creating the following file:
As you can see, this is pretty straight-forward. This will make a custom system named "Apps" in ES-DE, which gets its games from ~/ROMs/Apps, and will look for files with .sh or .py file extensions. Save the file, and you can now make the simple scripts that go into this folder.
For each app you want to launch from within ES-DE, create a .sh file in ~/ROMs/Apps and make them executable (chmod u+x script.sh. Here are mine:
Kodi.sh:
#!/usr/bin/env sh
open -a "Kodi"
Moonlight.sh:
#!/usr/bin/env sh
open -a "Moonlight"
YouTube.sh:
#!/usr/bin/env sh
open "https://www.youtube.com/feed/subscriptions?"
As you can see, these are simple as. The YouTube script opens your default browser to your subscriptions page on YouTube, but you can just as easily configure it to launch in a specified one, by using open -a "Firefox" "https://www.youtube.com/" if you want.
Save all files, restart ES-DE, and you should have a new category named Apps, containing your scripts. Launching the menu item will launch and give input focus to the app in question. Then use your gamepad/USB remote/whatever to navigate the given app. ES-DE and Moonlight works with gamepad navigation, but I've found that Kodi on macOS is hit or miss when it comes to this. It's worked a few times, but then stopped working, so I just use my remote for that.
Closing thoughts
A USB remote is usually a simple and cheap device, and can be found on eBay or AliExpress simply by searching for "usb pc remote control". Here is the one I use, which works great and costs next to nothing. This one has a button to switch between mouse mode and remote mode, which is important as you can't always navigate around macOS using the remote functionality alone.
There's lots of fun to be had in bed.... ;) Making Apple products an integral part of my bedroom experience isn't something I thought I would do, but it works surprisingly well. Now I have an all-in-one solution for gaming, movies, TV shows and YouTube content, all in one box, complete with uBlock to block YouTube ads, and SponsorBlock to skip sponsor segments!
For an extra smooth experience, you can configure macOS to open ES-DE when you log in by right clicking its dock icon and choosing Options > Open at login, and also making sure to uncheck "Restore windows [...]" whenever you log out/shut down the computer. I've also set both Kodi and the Mac to go to sleep after an hour of inactivity, so if I fall asleep, it won't run and use power needlessly throughout the night.